Learn To Read Guitar Tabs In Minutes. Essential Knowledge For The Guitarist
In this article, you’ll get to learn all about guitar tablature in just a few minutes!

Lee, a guitarist and the founder of Authority Guitar, has put together a guide to help you quickly learn the basics of guitar tablature!
Guitarists all over the world read guitar tabs to communicate with each other.
Whether you are looking for new music or some tips on how someone else has structured their song, it is crucial we can share our ideas through this universal language of Guitar Tablature!
Fortunately, it’s not difficult to learn. I’m hedging my bets to have you understand guitar tablature by the end of this article!
Common Types Of Tablature Found Online Or In Books
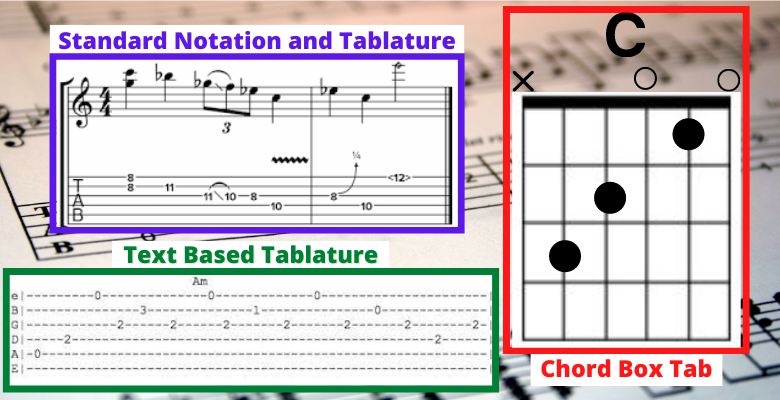
This is what you’re likely to come up with when searching for ‘Guitar Tabs’
- In Blue
You can see both Standard Notation and Tablature.
They are both instructing you to play the same lick but in two different languages.
The notes or numbers are written on two ‘staffs’. The staff at the top gives you the symbols and values. We won’t need to pay attention to this.
The bottom staff is where the ‘guitar tablature’ lies. As you can see from the left, the word TAB is written vertically. The staff instructs you where to play specific notes on the fretboard.
- In Green
This type of text is something you may have already seen. It’s straightforward to understand. It’s ‘Online’ based text like you’d find on most big guitar tab sites.
The horizontal chart shows you which notes to ‘fret’ and where. It also instructs you the series to play the notes (from left to right). You are also given vital pieces of information. These notes are found within the Am chord.
- In Red
You’ve possibly seen these vertical charts too. They are ‘chord boxes’. Unlike the tablature staff, these diagrams are upright, going from left to right.
This particular chord box is telling you to play C. The black dots are the notes you need to press down, and the O are the strings you play with the whole chord.
Don’t get confused! I will now explain in detail.
‘How’ To Read Guitar Tabs
I will be covering the following symbols below. Once you have a grip of these, and where to fret your fingers. You’re ready to go.
Let’s get into it
What We Need To Cover. The Essentials
- O– Open String
- X– Within Chord Boxes=‘Do not play’
- Chord Boxes
- What Do The Numbers Mean?
- Numbers Stacked On Top On Top Of Each Other
- Numbers From Left To Right
- H Hammer On
- p Pull Off
- h p Hammer On & Pull Off
- b Bend
- / Slide Up
- \ Slide Down
- <> Harmonics
- ~ Vibrato
- PM– Palm Mute
- XX– Muted Raking/ Percussive Strike
Let’s go through these one by one with examples and easy to read images.
1. Open String
When you are reading guitar tabs, it will seem like a lot is going on. You’ll be looking down at the instrument. (See pic above)
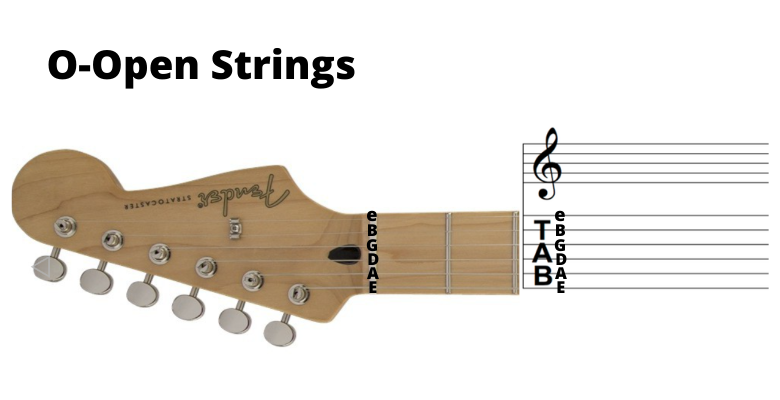
The six strings match up with the corresponding notes in tablature. This makes things easier for us as we try to learn. It would be best to always look ‘down’ at the guitar.
The six strings match up with corresponding ones on your guitar fretboard and represent each note’s name: E-A-D-G-B-e.
As E is on the staff twice, I’ve used a small ‘e’ to symbolize the ‘high e’ (furthest away).
The tablature symbol for an “open” string is O.
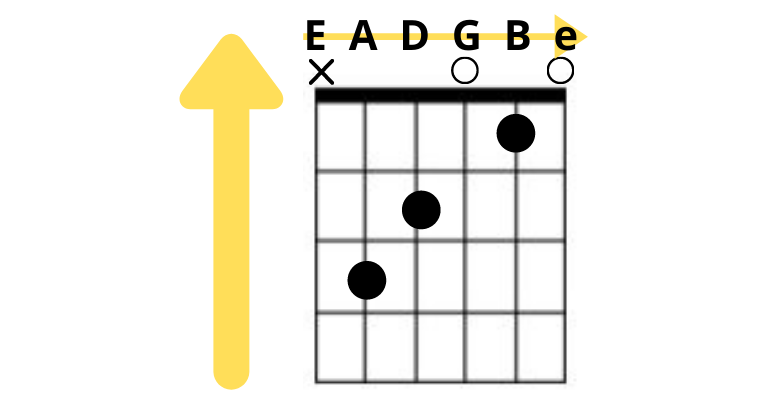
Below is a C chord-the chord box shows you six strings (vertical) and fretboard (horizontal).
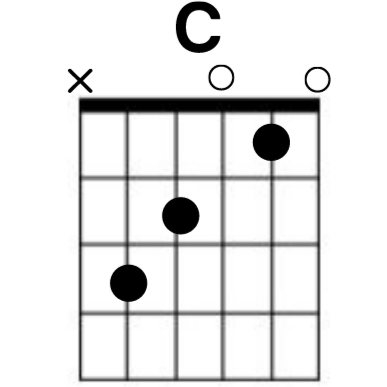
The black dots tell where to place fingers on the guitar. In this case we have 3 (black) notes to play PLUS two open(O) notes
2. X- Within Chord Boxes= ‘Do not play’
It’s also essential you pay attention to the letter X. The X tells you this string is not a part of the C chord. Suppose you were to misplay this string. The chord in question wouldn’t sound particularly good.
X’s are also found in tablature, as we’ll find out further down.
3. Chord Boxes Explained
Chord boxes are a representation of how chords are played on the guitar. They indicate where each finger is placed on the fretboard and what string and fret to play.
Chords can be represented by either numbers or letters. The higher up the fretboard the chord is played, the higher the note’s pitch will be.
Note: A chord box generally faces vertically, not like guitar tab.
Below you can see a C shape within a chord box. The black dots are where to place your fingers; the O’s are the open notes, which are part of the chord. And the X is not played.
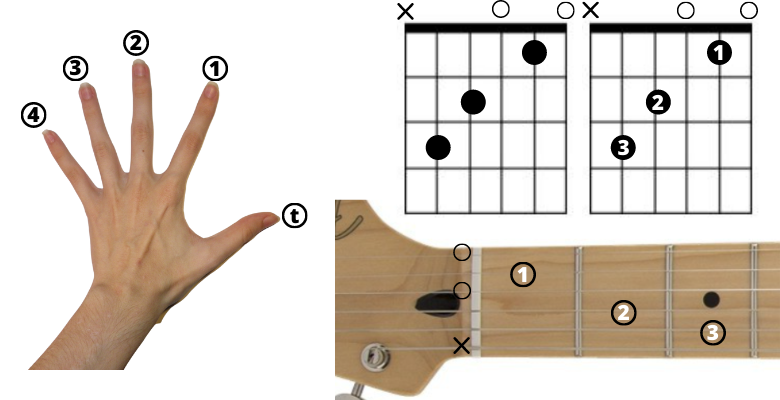
Chord Boxes With Numbers
If you come across a chord box with numbers attached to the black dots, this is simply helping you understand which fingers you should be using.
4. What Do The Numbers Mean?
Each number indicates which fret you should hold down on the string to play that note.
For instance, in guitar tablature, the number two on a line means to hold down the string on the second fret.
The higher up on the line the number is, the higher the note’s pitch will be. If there are no numbers on a line, that means to play that string open (O) without holding down any fret.
5. Numbers Stacked On Top Of Each Other
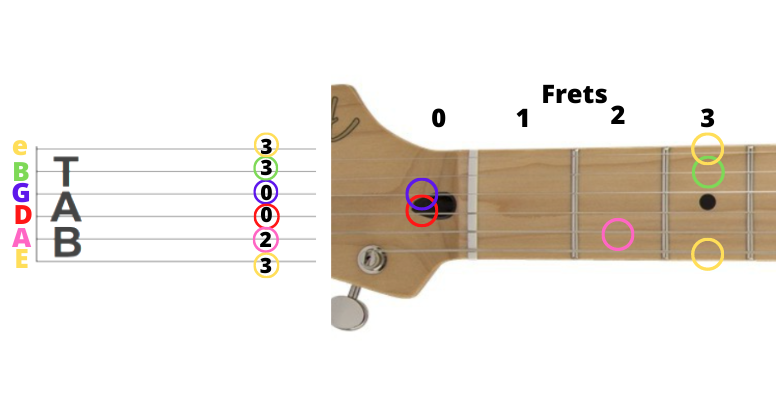
When numbers are on top of each other, that means you play them at the same time.
The tab to the left is showing you the G chord, which is all the strings played simultaneously.
The right-hand diagram is a breakdown of what the G chord looks like on your guitar. Pay attention to the two open notes.
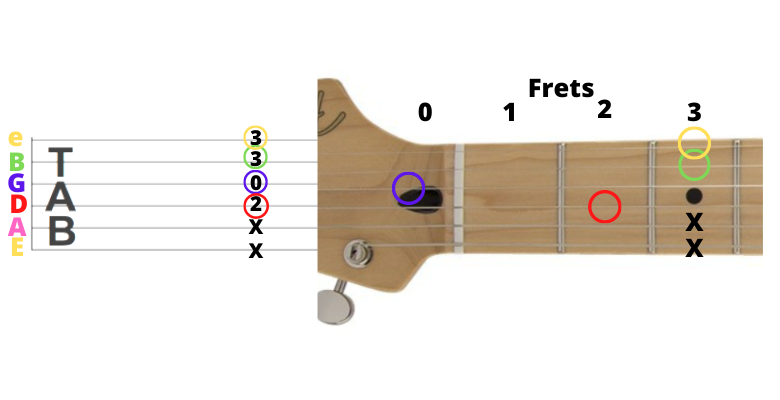
A lot of the time, you’ll notice XX’s on the tab in various places. When a chord is displayed with X’s, this means you don’t play those notes. Again, pay attention to the right-hand diagram.
6. Numbers From Left To Right
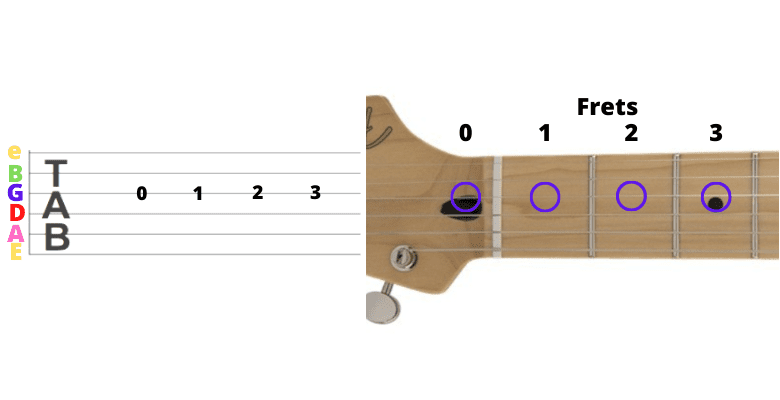
When numbers are presented in a row or line like this diagram, we play the notes one at a time.
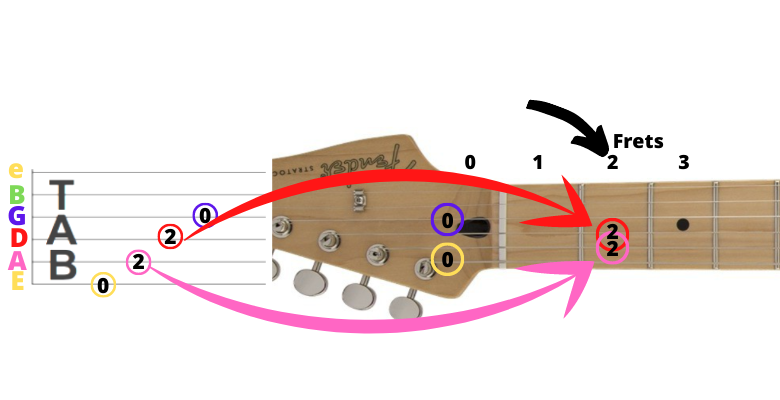
7. Hammer-On
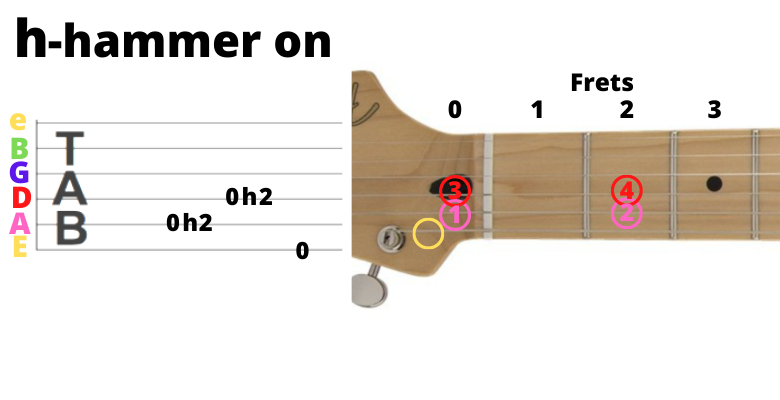
A hammer on is a technique used to play two notes (or more).
First, you need to pick the string with your right hand to perform a hammer on.
Once the string is picked, you need to use your left hand to hammer down the string you just picked. This will create a two-note phrase that is very popular in guitar music.
My example shows a short lick. Open E (yellow), Open A (pink1), then hammer onto the second fret (pink 2). Then repeat on the D string.
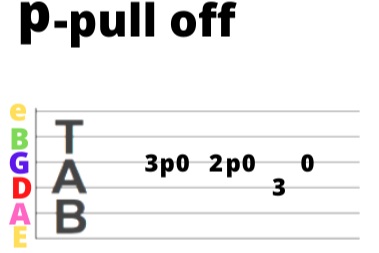
8. Pull-Offs
The most exciting part of guitar playing!
A pull off is when you play a note once and then “pull” the finger off that note to play another note.
Here’s a simple lick:
Start with the 3rd fret-4th string down (G string). Pluck it, then pull off, leaving it to ring open.
You now have two notes, but you’ve only plucked once.
Now repeat that on 2nd fret and see if you can finish it off!
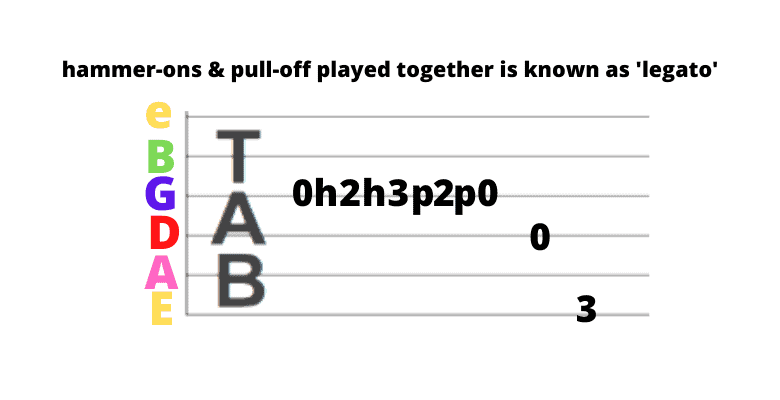
9. Hammer On & Pull Off
Many solos require you to Hammer on AND Pull Off. This is a skill you will learn as you go along. Below is a diagram of a lick that involves playing both. Start from left to right and follow it slowly.
10. Bending- Full, Half & Release Bending
Bending a string is the most enjoyable part of playing the guitar. You can gain so much satisfaction from it.
Bending increases the pitch of a note.
It’s a technique that will need some practicing, but once you’ve mastered it, it’s a skill you’ll have forever.
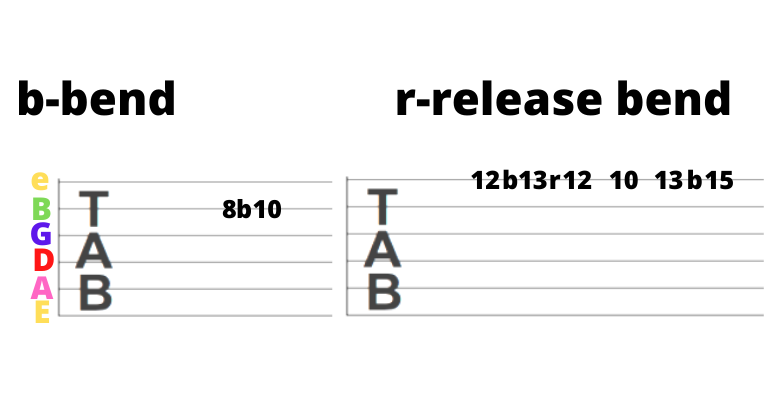
Left Pic: We have a simple bend from fret 8, 5th string down. We play that note and bend it up to note 10. That’s a whole step.
Right Pic: A release bend is the next step onwards from a standard bend. It may look complicated but take one note at a time.
A release bend comes into play after you’ve bent the note.
So in this instance, we need to bend up from 12 to 13-then release it back down to 12. Only pluck once! Then play 10 and bend again from 13 to 15.
11. Slide
Sliding notes up and down the fretboard is awesome fun. It can impress your audience.
Sliding is an effortless technique and will look like the diagram below.
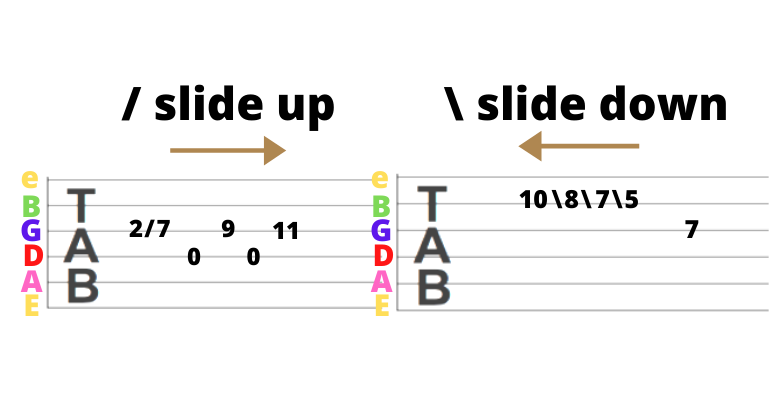
Be aware of which direction you’re sliding. The numbers inform you where to start and end your slide.
12. Harmonics
Natural Harmonics are more of an added extra. It’s often useful to sprinkle some extra magic over your chords.
This is what it looks like in tablature.

13. Vibrato
Vibrato is essential to learn, otherwise you’ll sound very wooden and ordinary. B.B King is the absolute master of the vibrato. Watch any live video of him and I’ll guarantee you’ll see him play vibrato within seconds.
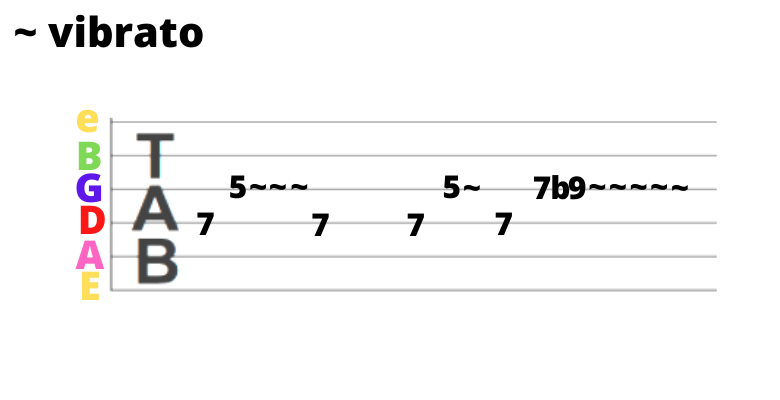
Vibrato is a technique where you slightly pull the string in an up and down motion (quickly).
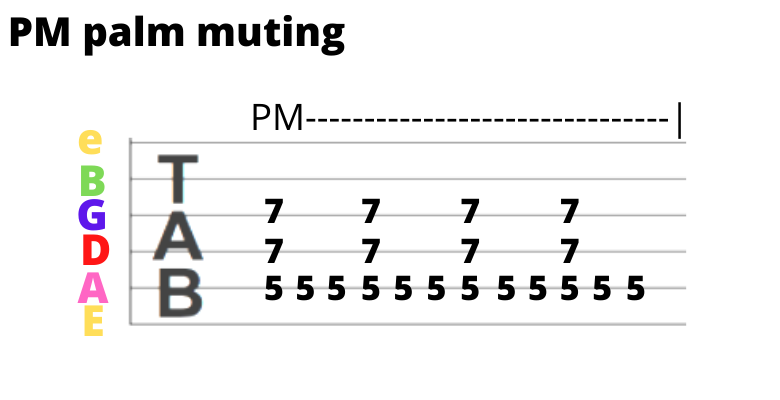
14. Palm Muted Playing
For instance, palm muting is used a lot in alternative rock like Nirvana. It’s also a big part of the metal guitar technique.
This palm-muted style of guitar playing is used to bring the volume down slightly or take more control of what you’re playing whilst playing lead licks. It’s almost like a dulling down of your strings.
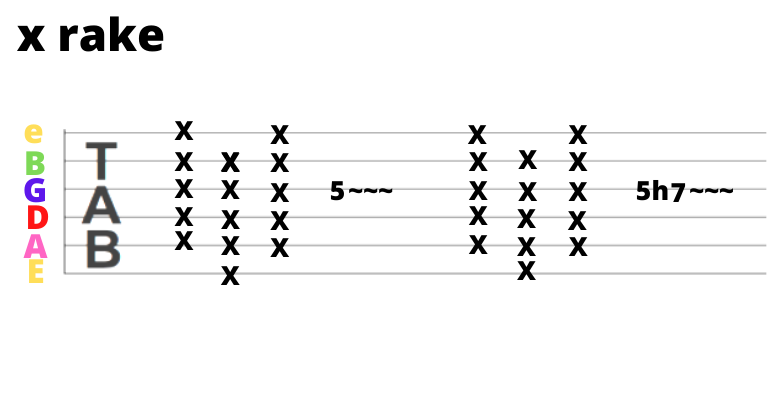
15. Muted Raking/ Percussive Strike
Raking and percussive strikes are easy to play. You’re not playing any notes as such, but it sounds fantastic if you’re playing along with the beat then adding a few notes in here and there. See below
To rake the strings, simply hold on to them, not allowing any strings to ring out. Scrape your pick up and down the strings.
To rake the strings simply hold on to them, not allowing any strings to ring. Scrape your pick up and down the strings.
A Final Word
Print this article out and go to a guitar tablature site. Choose something simple, see if you can read the tablature before attempting anything on guitar.
Use the symbols I’ve supplied at the top. After a week, I promise you’ll start to really get the hang of it.
Once you’ve nailed the symbols and numbering, the world is your oyster. You’ll be able to play any song you like. Well maybe!
Good Luck!
All graphics & charts within this article were created by Authority Guitar

ABOUT LEE: Lee has been playing guitar for over 25 years. In the 1990s he made a few TV appearances in London and supported a few big bands at festivals. He’s recently sung on radio and worked as a full-time guitarist/singer on a holiday resort. Lee is the founder of Authority Guitar, a site where he wants readers to enjoy every aspect of learning the guitar.
Published on March 11, 2022